Alright, let’s be real—traditional wedding cakes? Beautiful, yes. Memorable? Maybe. But you know what people actually remember?
That one wedding where the cake was made entirely out of giant, soft, gooey cookies stacked tall like a tower of happiness.
That’s what a wedding cookie cake is. It’s fun. It’s unexpected. And honestly, it feels a little more like you.
It doesn’t try too hard, it doesn’t need 7 flavors of mousse or edible gold—just thick, golden-brown chocolate chip cookies, creamy vanilla buttercream, and a whole lot of heart.
I made one of these for a friend’s wedding, and let me tell you—it got more compliments than the bride’s dress (okay, maybe not quite more, but close).
People were hovering around it before dinner even started, sneaking little frosting tastes and asking, “Wait, is that COOKIE?”
It’s a dessert that makes people feel something. It’s familiar in the best way, but it still looks stunning enough to hold its own at the center of a fancy reception. And making it?
Honestly not that hard, especially when you know what you’re doing.
If you’re into baking and want to create something that feels warm, personal, and a little nostalgic—but still makes jaws drop when it’s rolled out—this wedding cookie cake might be exactly what you’re after.
Let me walk you through how to make it from scratch, just the way it looks in the photo. Every single detail.
Wedding Cookie Cake Recipe
Ingredients
For the Cookie Layers (Makes 8 Layers, ~9-inch Rounds, Plus 3 Smaller Tiers):
- 3 cups unsalted butter, softened
- 2 ½ cups light brown sugar, packed
- 1 ½ cups granulated sugar
- 6 large eggs
- 2 tbsp vanilla extract
- 8 cups all-purpose flour
- 2 tsp baking soda
- 1 tsp baking powder
- 2 tsp sea salt
- 4 cups semisweet chocolate chips
For the Vanilla Buttercream Filling:
- 2 cups unsalted butter, room temperature
- 6 cups powdered sugar, sifted
- 2 tbsp heavy cream (or milk)
- 1 tbsp vanilla extract
- Pinch of salt
For Assembly & Decoration:
- 6–8 white roses
- Sprigs of baby’s breath
- Cookie cake topper (customized with initials, e.g., A + Y)
- Piping bag with a large round tip
- 10” cake board for base
- Offset spatula or spoon
- Floral tape (optional, for wrapping stems)
Instructions
- In a large mixing bowl, cream together softened butter, brown sugar, and granulated sugar using a stand or hand mixer until light and fluffy (about 3 minutes).
- Beat in the eggs one at a time, then add the vanilla extract.
- In a separate large bowl, whisk together the flour, baking soda, baking powder, and salt.
- Gradually add the dry ingredients to the wet mixture, mixing on low speed.
- Fold in the chocolate chips using a spatula or wooden spoon.
- Divide the dough into 8 large portions and 3 smaller portions (for the top 3 tiers), then chill the dough for 30 minutes.
- Preheat oven to 325°F (165°C). Line large baking sheets with parchment paper.
- Using a 9-inch cake ring or template, shape and flatten one portion of chilled dough into a thick, round cookie on the parchment paper. Smooth the edges with your fingers or a spatula.
- Bake each cookie for 18–22 minutes, or until golden brown on the edges and slightly soft in the center. Rotate pans halfway through for even baking.
- Let cookies cool completely on a wire rack. They’ll firm up slightly as they cool.
- Tip: Repeat the process with smaller rings (6-inch and 4-inch sizes) for the top three tiers.
- In a large mixing bowl, beat the softened butter until pale and fluffy (about 3 minutes).
- Gradually add powdered sugar, one cup at a time, mixing on low at first, then increasing to medium-high.
- Add vanilla extract, heavy cream, and a pinch of salt.
- Beat for an additional 2–3 minutes until light, fluffy, and pipeable.
- Place the largest cookie layer on a cake board or serving platter.
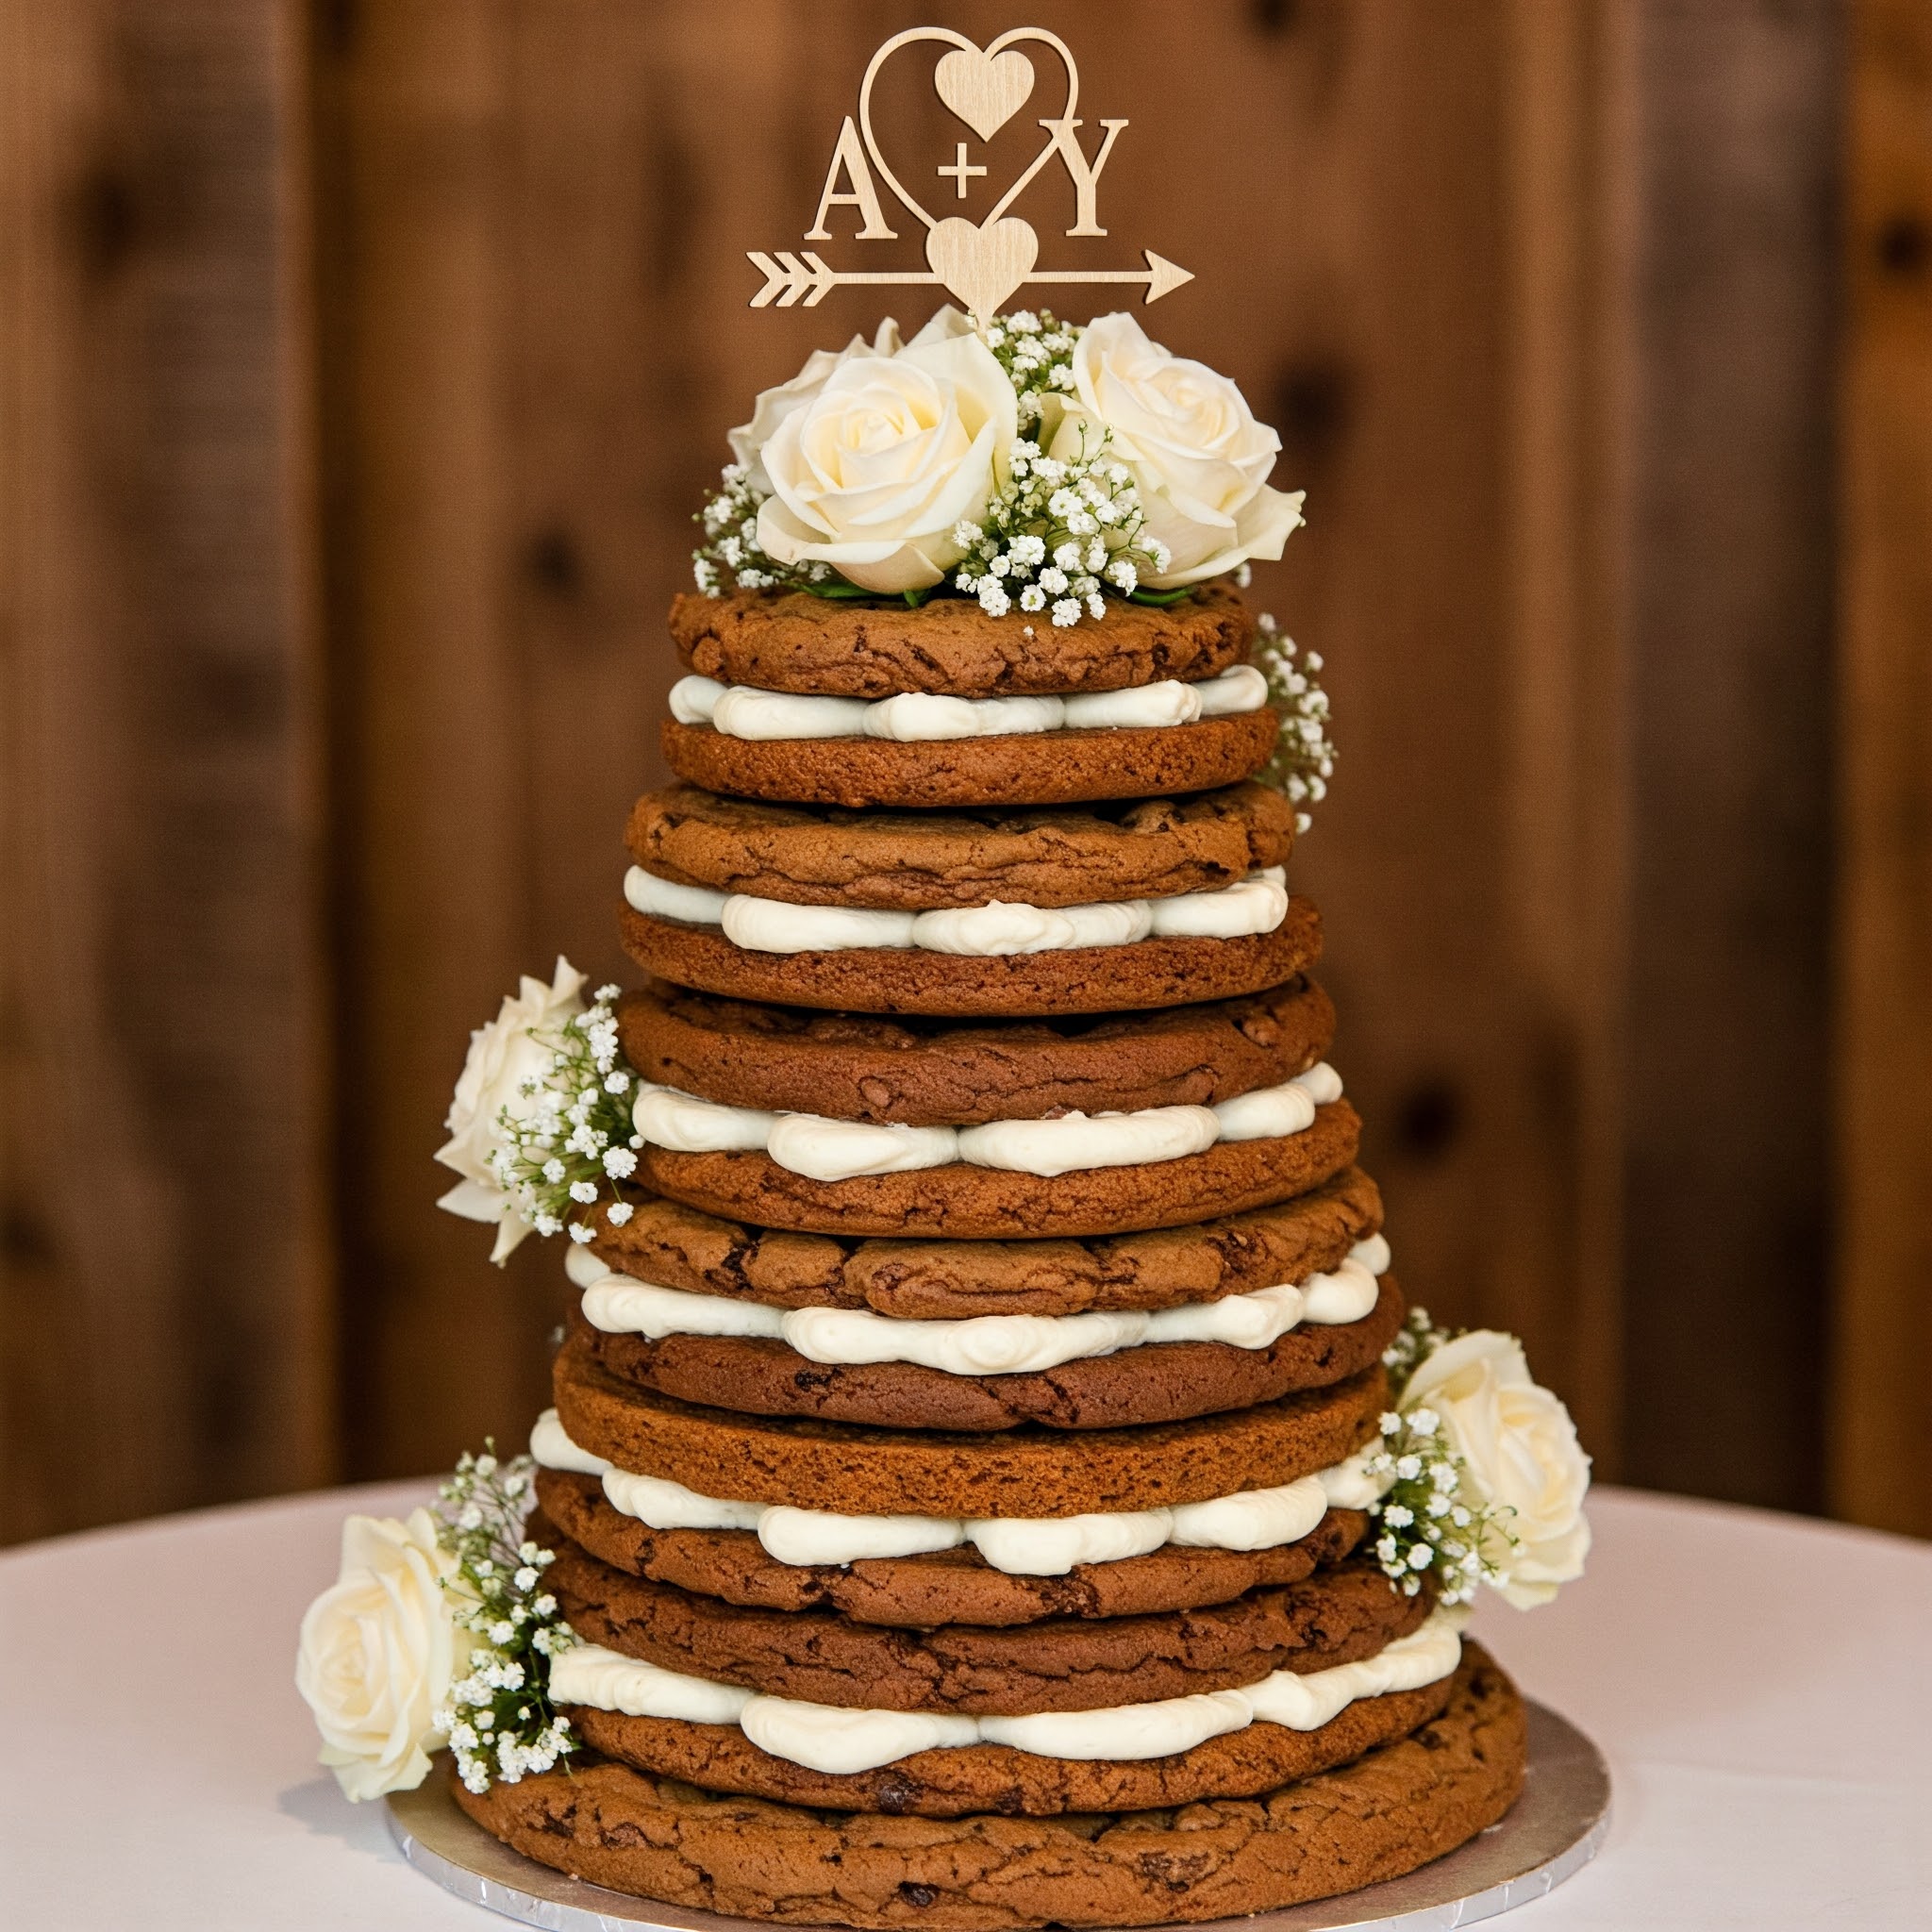
- Using a piping bag fitted with a round tip, pipe thick, even rings of buttercream around the edge and inside the circle. You want visible layers just like in the photo.
- Carefully place the next cookie layer on top and press down slightly.
- Repeat the piping and layering process until all cookie layers are stacked, ending with the smallest cookie layer on top.
- Gently tuck in white roses and sprigs of baby’s breath between cookie tiers — refer to the image for placement: mainly at the bottom, middle, and top.
- Wrap the flower stems with floral tape if inserting into the cake directly, or use small water picks to keep them fresh.
- Insert your custom monogram cake topper into the top layer.
- The cookies should be chewy, slightly crisp on the edges, and soft enough to cut through easily when serving.
- For best results, make the cookie layers a day ahead and store them airtight to allow flavors to settle.
- Use food-safe flowers or ensure blooms are wrapped securely if inserting directly into the cake.
- Slice with a serrated knife for neat portions.

How Do You Make A Tiered Cookie Cake For A Wedding?
Making a tiered cookie cake at home is easier than it looks—but it does need a few smart tricks to keep it looking neat and staying firm.
- Chill the dough before shaping: Cold dough is easier to press and shape into even rounds without spreading too much in the oven.
- Use cake rings or templates: This helps you create perfect circles for each tier. Just press the dough into the ring directly on the parchment paper.
- Bake cookies until just golden: You want the edges firm but the center slightly soft. This makes cutting easier later.
- Cool completely before stacking: Never stack warm cookie layers. Let them cool fully or they’ll melt the frosting.
- Use thick buttercream between layers: This gives height, holds everything together, and adds flavor.
- Pipe frosting close to the edges: So it looks neat and doesn’t slide out when you press the layers together.
- Use a cake board under the base cookie: This keeps the whole cake stable when moving or serving.
- Decorate with light items only: Use fresh flowers, small toppers, or berries—avoid heavy decorations.
Can You Use Cookies Instead Of Traditional Wedding Cake?
Yes, absolutely—you can! Many couples are choosing cookie cakes as a fun and fresh alternative to traditional wedding cakes.
- It’s more personal: A cookie cake can feel homemade, warm, and full of memories.
- Easier to cut and serve: No complicated slicing—just soft cookies with frosting layers in between.
- You can prep it ahead: Bake the cookies the day before and assemble fresh.
- Guests love the surprise: It’s different, and people actually get excited when they see it.
- Perfect for smaller weddings: Great if you’re not feeding 200+ guests.
How Do You Stack Cookies To Make A Wedding Cake?
Stacking cookies into a wedding cake shape is simple once you know the basic steps. The key is to keep everything even and balanced.
- Use same-sized cookie layers for each tier: Make 2–3 layers per tier using a cookie cutter or round mold.
- Pipe frosting evenly between each layer: Use a round piping tip to get clean, uniform circles of frosting.
- Press gently as you stack: Don’t squash the cookies—just a soft press to keep things in place.
- Use a dowel or skewer for tall cakes: If you’re going over 3 tiers, this helps prevent sliding.
- Decorate only after stacking is done: It’s easier to place flowers or toppers when the cake is steady.
- Refrigerate for 20–30 minutes before moving: This firms up the frosting and helps the cake hold together better.
Does A Cookie Cake Need To Be Refrigerated?
Not every cookie cake needs the fridge – it depends on the filling and frosting.
- If filled with cream cheese or dairy-based frosting: Store in the fridge to keep it fresh and safe.
- If using buttercream or firm frosting: Can stay at room temperature for 1–2 days in a cool, dry place.
- Use an airtight container or wrap well: This keeps the cookie layers soft and prevents drying.
- Before serving from fridge: Let it sit out for 30 minutes so the cookie softens a bit.
Can I Make A Cookie Wedding Cake Ahead Of Time?
Yes, you can! Making ahead can save time and reduce stress.
- Bake cookie layers 2–3 days early: Let them cool fully and store in airtight containers.
- Frosting can be made 1–2 days before: Keep in the fridge and whip again before using.
- Assemble the cake 1 day before event: This helps the cake hold its shape and flavors blend well.
- Keep flowers or decorations separate: Add them on the day of the event to stay fresh.
How Do You Transport A Wedding Cookie Cake Safely?
Transporting it right keeps it beautiful and damage-free.
- Use a strong cake board or tray: It must support the weight without bending.
- Chill the cake before moving: This makes frosting firm and prevents sliding.
- Place in a tall cake box or container: It should match the size and height of the cake.
- Add support inside the box: Use non-slip mats or bubble wrap around the cake base.
- Drive slowly and avoid sudden turns: A smooth ride is key to no cracks or shifts.
Can You Decorate A Cookie Cake With Fresh Flowers?
Yes – fresh flowers make cookie cakes look lovely and unique.
- Use only food-safe, clean flowers: Wash gently and trim the stems.
- Wrap stems in foil or flower tape: This avoids touching frosting or cookies directly.
- Add flowers just before serving: So they stay fresh and crisp.
- Keep flowers away from moist areas: This prevents wilting and sliding.
How Do You Keep A Cookie Cake From Getting Dry?
Nobody likes a dry cookie cake – here’s how to keep it soft and fresh.
- Cover it well with plastic wrap or a cake dome: This locks in the moisture.
- Don’t overbake the cookie layers: Slightly underbaked cookies stay soft longer.
- Use moist fillings like buttercream or whipped frosting: These help the cookies stay soft.
- Store in an airtight container: Air can dry out the cookie cake quickly.
- Add a slice of bread inside the container: It keeps the cookies from drying out.
Can I Make A Gluten-Free Wedding Cookie Cake?
Yes, you can easily make a gluten-free version that tastes great too.
- Use a trusted gluten-free flour blend: One made for baking gives better texture.
- Add a little extra moisture (like milk or yogurt): It keeps gluten-free cookies soft.
- Chill the dough before baking: This helps the cookies hold their shape.
- Test-bake one small cookie first: Check the texture before making the full batch.
- Stack with thick frosting layers: It helps balance the texture of gluten-free cookies.
How Thick Should Each Cookie Layer Be For A Tiered Cake?
The right thickness helps the cookie cake stay strong and not break.
- Ideal thickness is about ½ inch (1.2 cm): Thick enough to hold, thin enough to eat.
- All layers should be the same size: So the cake is stable and balanced.
- Too thin cookies can break under weight: So avoid less than ¼ inch.
- Too thick cookies are hard to cut and eat: So don’t go over ¾ inch.
- Bake each cookie on the back of a flat tray: It keeps the shape even.
Do Cookie Cakes Cut Easily At Weddings?
Yes, cookie cakes are easy to cut, but using the right method makes it even smoother.
- Use a sharp, long knife: This helps slice through thick layers cleanly.
- Chill the cake a little before cutting: A slightly firm cake holds its shape better while slicing.
- Dip knife in warm water: Wipe between cuts to keep edges neat and clean.
- Avoid using serrated knives: They can break the cookie instead of cutting it smoothly.
- Mark cutting lines lightly before slicing: It helps guide even portions.
What Tools Do I Need To Make A Cookie Wedding Cake At Home?
You don’t need fancy equipment – just the basics to bake and stack.
- Round cake pans or cookie templates: For shaping same-size cookie layers.
- Electric hand or stand mixer: To make cookie dough and frosting easily.
- Piping bag and round tip: For neat frosting between cookie layers.
- Offset spatula or butter knife: To spread frosting evenly.
- Cooling racks: To cool cookie layers quickly without sogginess.
- Cake board and base: To support the full weight of the stacked cake.
- Flower tape or foil: If decorating with real flowers.
Can You Freeze Cookie Cake Layers Before Assembly?
Yes, you can freeze the cookie layers ahead to save time and prep better.
- Cool cookies fully before freezing: Warm cookies can turn soggy in the freezer.
- Wrap each cookie layer in cling film: Then place in a freezer-safe bag or container.
- Label and date each package: Helps keep track of freshness.
- Use within 3–4 weeks for best taste: After that, texture may change.
- Thaw at room temperature before frosting: Don’t microwave – it can make them too soft.
You May Also Like To Check Out These Recipes:
- Spring Wedding Cake
- 18th Birthday Cake
- Watermelon Cake
- Easter Bundt Cake
- Easter Carrot Cake
- Care Bear Cake
- Spring Birthday Cake
- Lemon Loaf Cake
- 21st Birthday Cake
- Pistachio Pudding Cake
- Graduation Cake Pops
- Light & Moist Coconut Cake
- Mother’s Day Cake To Melt Hearts
- Soft And Fluffy Mango Cake Delight