
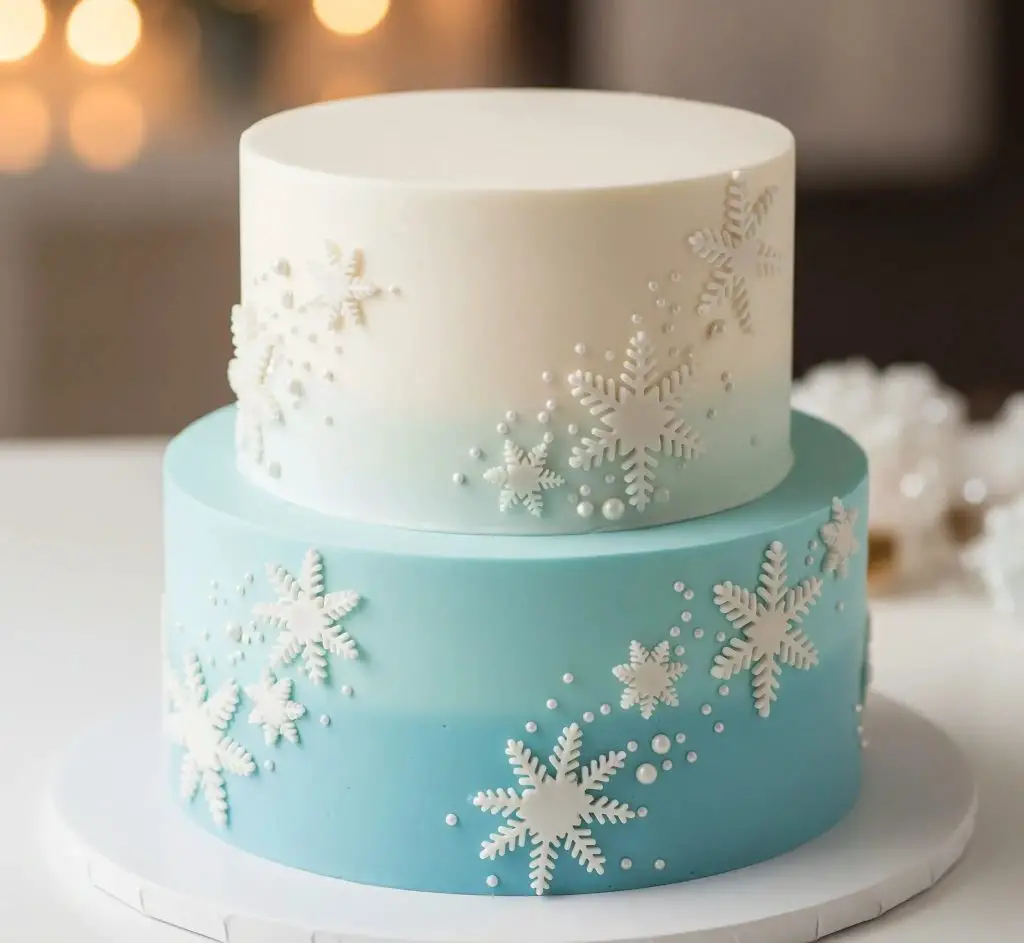
I still remember the first time I made a Snowflake Cake. I had this picture in my head of soft blue frosting blending into white, like the sky meeting fresh snow, and I wasn’t sure if I could actually pull it off.
But when I placed the last little fondant snowflake on the side, it felt like a tiny winter story had come to life right on my cake stand.
This cake feels special to me because it’s more than just layers of sponge and frosting—it’s the kind of bake that makes you stop and smile before cutting the first slice.
The ombre colors, the pearl accents, the delicate details… they make it look almost too perfect, but the best part is when you finally taste it.
Moist cake, creamy frosting, and a design that makes people’s eyes light up—it’s honestly one of those cakes that stays in your memory long after the last crumb is gone.
Snowflake Cake Recipe
Ingredients
For the Cake (Two-Tier, 6-inch and 8-inch round cakes):
- 4 cups all-purpose flour
- 3 cups granulated sugar
- 1 cup unsalted butter, softened
- 1 cup vegetable oil
- 6 large eggs, room temperature
- 2 cups whole milk, room temperature
- 1 tablespoon pure vanilla extract
- 1 tablespoon baking powder
- ½ teaspoon baking soda
- ½ teaspoon salt
For the Buttercream Frosting:
- 2 cups unsalted butter, softened
- 8 cups powdered sugar, sifted
- 6 tablespoons whole milk
- 1 tablespoon pure vanilla extract
For the Ombre Effect and Decoration:
- Gel food coloring in sky blue
- White fondant
- Snowflake fondant cutters in different sizes
- Edible pearls (various sizes)
- Edible glue or a mixture of powdered sugar + a drop of water
Instructions
- Preheat the oven to 350°F (175°C). Grease and line two 8-inch cake pans and two 6-inch cake pans with parchment paper.
- In a large bowl, cream together butter, oil, and sugar until pale and fluffy. Add eggs one at a time, mixing well after each addition. Stir in vanilla extract.
- In a separate bowl, whisk flour, baking powder, baking soda, and salt.
- Alternate adding dry ingredients and milk into the butter mixture, starting and ending with dry ingredients. Mix until just combined—don’t overmix.
- Divide batter evenly between prepared pans. Bake 30–35 minutes, or until a toothpick comes out clean.
- Let cakes cool in pans for 10 minutes, then transfer to a wire rack to cool completely.
- Beat butter until creamy and smooth. Gradually add powdered sugar, 1 cup at a time.
- Add vanilla and milk, beating until frosting is light and fluffy. If too thick, add 1 extra tablespoon of milk.
- Once cakes are cool, trim the tops to make them level.
- Place one 8-inch cake layer on a cake board, spread buttercream on top, then place the second 8-inch layer. Repeat for the 6-inch cakes.
- Apply a thin crumb coat of buttercream over each tier and refrigerate for 30 minutes until firm.
- Divide buttercream into two bowls. Leave one white and tint the other with sky blue gel coloring.
- Frost the bottom tier with blue buttercream, smoothing it evenly. Frost the top tier with white buttercream.
- For a seamless ombre transition where the two tiers meet, lightly blend a touch of blue into the lower part of the top tier using an offset spatula. Chill for 20 minutes.
- Roll out white fondant to about ⅛ inch thickness.
- Use different snowflake cutters to cut out shapes. Let them dry for at least 1 hour at room temperature so they hold their shape.
- Attach dried fondant snowflakes randomly around both tiers using edible glue.
- Add edible pearls in clusters to mimic falling snow. Place larger pearls closer to the snowflakes and smaller ones scattered around for a natural effect.
- Stack the 6-inch tier on top of the 8-inch tier, using dowels in the bottom tier for support.
- Smooth everything once more with a cake smoother for a flawless finish.
- Refrigerate the cake until ready to serve, but allow it to come to room temperature before slicing for the best texture.
How Do You Decorate a Snowflake Cake With Fondant Snowflakes?
Decorating with fondant snowflakes can make your cake look magical, but it’s all about patience and placement.
- Roll out fondant thinly: Keep it even so the snowflakes look delicate.
- Use different size cutters: This makes the design look more natural.
- Let snowflakes dry: Leave them for at least an hour so they hold their shape.
- Attach carefully: Use edible glue or a tiny dab of buttercream to stick them.
- Add pearls around: Small edible pearls make the snowflakes look sparkling.
Can I Make a Snowflake Cake Without Fondant?
Yes, you can decorate a Snowflake Cake without fondant, and it still looks beautiful.
- Buttercream piping: Use a small star or snowflake tip to pipe designs.
- Royal icing: Pipe snowflakes on parchment, let them dry, then place on the cake.
- White chocolate: Melt, pipe into snowflake shapes, freeze, and then add to the cake.
Can I Prepare a Snowflake Cake a Day In Advance?
Making this cake ahead is a smart idea and it tastes even better the next day.
- Bake the cakes: Bake, wrap in plastic, and keep at room temperature.
- Frosting: Prepare the buttercream a day before and keep in the fridge.
- Assemble: You can frost and decorate the cake the night before serving.
How Do You Keep The Snowflake Decorations From Breaking?
Snowflakes are fragile, so handle them gently.
- Dry them properly: Give enough time to harden before use.
- Store safely: Keep them on parchment in an airtight box.
- Use gentle pressure: Don’t press too hard when sticking them.
- Add last: Place them on the cake after frosting has set.
What Size Pans Are Best For Making a Two-Tier Snowflake Cake?
The right size pans help the cake look balanced and easy to stack.
- Bottom tier: 8-inch round pans.
- Top tier: 6-inch round pans.
- Thickness: Use 2 layers for each tier to give height and structure.
How Do You Make Edible Snowflakes For Cakes?
There are a few fun ways to make edible snowflakes.
- Fondant: Roll and cut with snowflake cutters.
- Royal icing: Pipe on parchment, dry overnight, then lift carefully.
- Chocolate: Pipe melted white chocolate into snowflakes, let set, and use.
How Do You Store a Decorated Snowflake Cake?
To keep the cake fresh and safe, storage matters a lot.
- Room temperature: If the weather is cool, keep covered in a cake box for up to 24 hours.
- Refrigerator: Store in the fridge if the frosting is soft or perishable.
- Cover gently: Use a large cake dome or box so the decorations don’t get damaged.
Can I Freeze a Snowflake Cake After Decorating?
Freezing helps if you want to keep the cake longer, but do it the right way.
- Freeze undecorated layers: Wrap in plastic and foil, then freeze.
- Fully decorated cake: Place in the freezer until frosting hardens, then wrap well.
- Thaw slowly: Move to the fridge overnight before serving.
You May Also Like To Check Out These Recipes:
- Thanksgiving Cake Pops
- Thanksgiving Cake
- Tiramisu Cake
- Red Vintage Cake
- Swedish Apple Cake
- Gingerbread Cake
- Scorpio Birthday Cake
- Black Velvet Cake
- Apple Cinnamon Cake
- Cranberry Cake
- Betty Boop Cake
- Jack Skellington Cake
- Apple Crumb Cake
- Eggnog Cake
- Pastel Cake
- Apple Upside Down Cake
- Jewish Apple Cake
- Yule Log Cake