
Every December, I find myself reaching for recipes that don’t just taste good, but actually feel like Christmas. For me, these cake pops do exactly that.
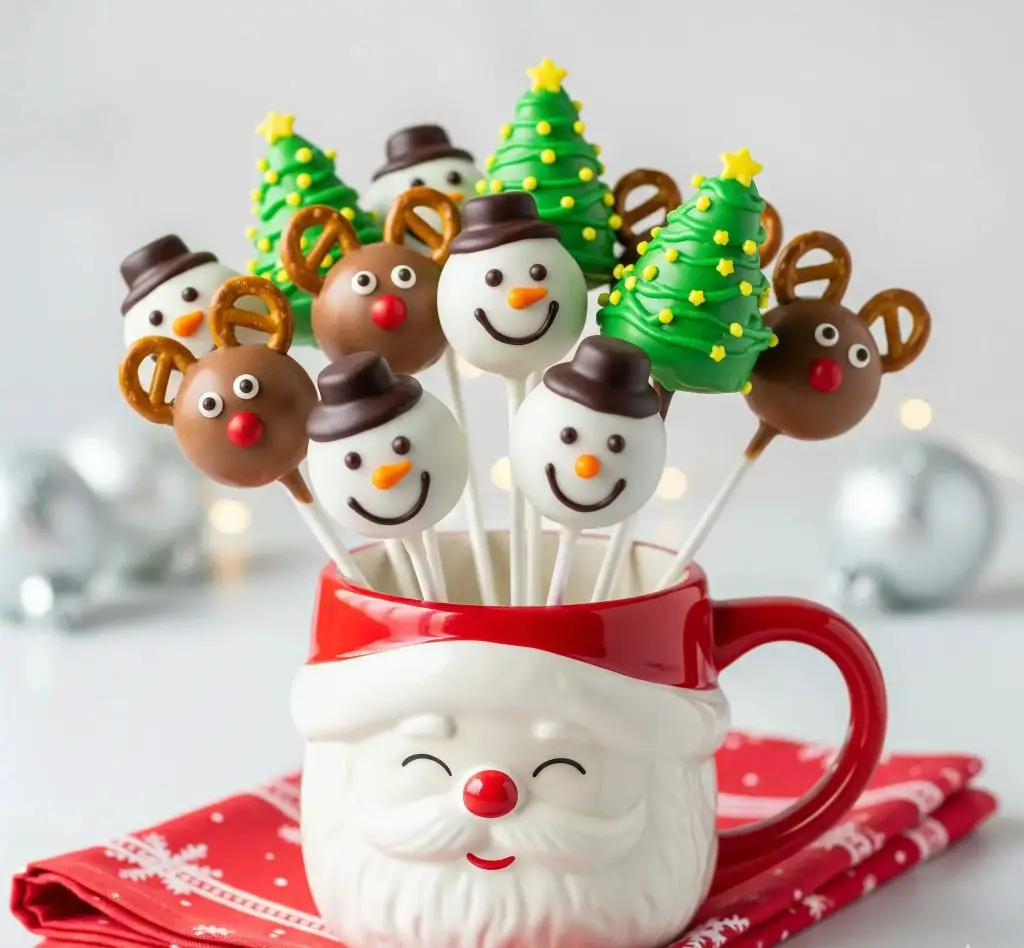
They’re cute, playful, and always bring out the kid in me—whether it’s shaping a snowman’s little hat, giving a reindeer its red nose, or decorating a mini Christmas tree with sprinkles.
What I love most is how they instantly light up a holiday table. Friends and family don’t just eat them, they smile at them first.
And honestly, that’s the joy of making these—watching everyone’s reaction before they take that first bite.
They’re soft, chocolatey, and sweet on the inside, while the outside gives you that satisfying crunch from the candy coating.
It’s a holiday project that doubles as dessert, and it’s always worth the effort.
Christmas Cake Pops Recipe
Ingredients
- 1 baked vanilla cake (about 9×13 inch, cooled completely)
- 1 cup vanilla frosting (homemade or store-bought)
- 400 g white candy melts
- 400 g milk chocolate candy melts
- 200 g green candy melts
- 50 g yellow candy melts
- 12 mini pretzels (for reindeer ears)
- 8 small red candy-coated chocolates (for reindeer noses)
- 12 chocolate buttons (for snowman hats)
- 8 orange sprinkle pieces (for snowman noses)
- Black edible marker or melted dark chocolate (for eyes and smiles)
- Round white sprinkles (for reindeer eyes)
- Small yellow star sprinkles (for Christmas trees)
- Small round colored sprinkles (for tree decorations)
- 20–24 lollipop sticks
Instructions
- Crumble the cooled vanilla cake into a large bowl until it resembles fine crumbs. Add vanilla frosting gradually, mixing with a spatula or hands until the mixture holds together but is not overly sticky.
- Roll small portions of the mixture into smooth balls (about 1 inch in diameter) for reindeer and snowmen.
- Shape cone-like pieces for Christmas trees. Place them on a tray lined with parchment paper.
- Chill in the refrigerator for 1–2 hours, or freeze for 20 minutes until firm.
- Melt a small amount of candy melts. Dip one end of each lollipop stick into the melted coating, then insert into the cake balls or cones. This helps secure them. Chill for 10 minutes to set.
- For snowmen: Dip the cake pops into melted white candy melts. Tap off excess coating and let them dry upright.
- For reindeer: Dip into melted milk chocolate candy melts, shake off excess, and let set.
- For Christmas trees: Dip cone-shaped cake pops into melted green candy melts and let dry.
- Attach chocolate buttons on top as hats before the coating dries.
- Use orange sprinkles for noses.
- Draw eyes and smiles with edible marker or fine piping of dark chocolate.
- Insert mini pretzels on each side as antlers before the coating hardens.
- Attach red candy-coated chocolates as noses.
- Place small white sprinkles for eyes and dot them with dark chocolate for pupils.
- Pipe extra green candy melts in zig-zag lines over the cones to mimic tree branches.
- Place colored sprinkles on while the coating is still soft.
- Finish with a yellow star sprinkle on top.
- Allow all decorated cake pops to dry completely at room temperature. Arrange them in a festive mug or foam block for serving, just like the image.
How Do You Make Christmas Cake Pops From Scratch?
Making them from scratch is simple once you know the steps. Start with a baked cake, add frosting, shape, chill, dip, and decorate.
- Bake the cake: Use vanilla, chocolate, or red velvet for Christmas colors.
- Crumble well: Break the cooled cake into fine crumbs.
- Mix with frosting: Add frosting slowly until the mix holds together.
- Shape the pops: Roll into balls or shape into trees and snowmen.
- Insert sticks: Dip sticks in melted candy first, then push into the cake balls.
- Chill before dipping: Refrigerate or freeze until firm so they don’t fall apart.
How Do You Get Smooth Coating On Cake Pops?
A neat finish makes them look professional. The secret is in how you melt, dip, and let them set.
- Melt gently: Heat candy melts in short intervals and stir often.
- Thin if thick: Add a little vegetable oil if coating feels heavy.
- Dip straight: Insert the pop straight down and lift in one smooth motion.
- Tap carefully: Gently tap the stick to remove extra coating.
- Dry upright: Let pops harden standing in foam or a holder.
What Is The Trick To Keeping Cake Pops From Falling Apart?
The right frosting balance and chilling make a big difference.
- Use right ratio: Too much frosting makes them soft, too little makes them crumbly.
- Chill properly: Cold cake pops stay stronger during dipping.
- Secure sticks: Always dip the stick in melted candy before inserting.
- Avoid overhandling: Don’t swirl them too much in the coating.
Can I Use a Boxed Cake Mix To Make Christmas Cake Pops?
The right frosting balance and chilling make a big difference.
- Use right ratio: Too much frosting makes them soft, too little makes them crumbly.
- Chill properly: Cold cake pops stay stronger during dipping.
- Secure sticks: Always dip the stick in melted candy before inserting.
- Avoid overhandling: Don’t swirl them too much in the coating.
How Do You Stop Cake Pops From Cracking After Dipping?
Cracking happens when the inside and outside are at very different temperatures.
- Don’t overchill: Pops should be cool but not frozen hard.
- Let coating cool: Don’t dip into very hot candy melts.
- Set at room temp: Allow pops to dry naturally instead of rushing in the fridge.
Can Christmas Cake Pops Be Made Ahead Of Time?
Yes, you can prepare them in advance and they’ll still taste fresh.
- Plain pops: Store undipped balls in the fridge for 2–3 days.
- Dipped pops: Keep decorated pops at room temperature for up to 2 days.
- Longer storage: Freeze if making more than 3 days ahead.
Do I Need a Cake Pop Maker To Make Christmas Cake Pops?
No, you don’t need one at all. A baked cake, frosting, and your hands are enough.
- By hand: Roll balls or shapes with your hands easily.
- Optional tool: A cake pop maker helps with perfect round shapes.
- Same taste: Both ways give the same sweet and soft inside.
Can I Use Candy Melts Instead Of Chocolate For Cake Pops?
Yes, candy melts are the easiest and most common option for coating.
- Easy melting: Candy melts melt smoothly without seizing.
- Colorful: Available in many shades for Christmas themes.
- Beginner friendly: Less tempering needed than real chocolate.
- Decorating made simple: Perfect for designs like reindeer, snowmen, and trees.
Why Do My Cake Pops Keep Sliding Off The Sticks?
This usually happens when the mix is too soft or the stick isn’t secured.
- Dip stick first: Always coat the stick in melted candy before inserting.
- Chill the pops: Cold pops hold firmly on sticks.
- Don’t overfrost: Too much frosting makes the mix heavy and soft.
- Gentle dipping: Dip straight in and out, not swirling around.
What Is The Best Way To Store Decorated Christmas Cake Pops?
Storage depends on when you plan to serve them.
- Short term: Keep at room temperature in a sealed container for 1–2 days.
- Refrigerator: Store up to 1 week, but cover tightly to avoid moisture.
- Presentation: Stand upright in foam or a holder to protect decorations.
Can I Freeze Christmas Cake Pops For Later?
Yes, freezing is a great way to keep them fresh for weeks.
- Before dipping: Freeze shaped cake balls in a container and dip later.
- After dipping: Wrap each pop in plastic wrap and freeze in a box.
- Defrost gently: Thaw overnight in the fridge to prevent cracking.
You May Also Like To Check Out These Recipes:
- Cranberry Christmas Cake
- Christmas Poke Cake
- Holiday Cake
- Christmas Tree Cake
- Red Velvet Bundt Cake
- Winter Wonderland Cake
- Snowflake Cake
- Thanksgiving Cake Pops
- Thanksgiving Cake
- Tiramisu Cake
- Red Vintage Cake
- Swedish Apple Cake
- Gingerbread Cake
- Scorpio Birthday Cake
- Black Velvet Cake
- Apple Cinnamon Cake
- Cranberry Cake
- Betty Boop Cake
- Jack Skellington Cake