
I’ve always believed that cakes can be more than just dessert—they can be a little piece of art on the table.
The first time I made a cheetah print cake, I remember stepping back after piping those spots and feeling this rush of excitement.
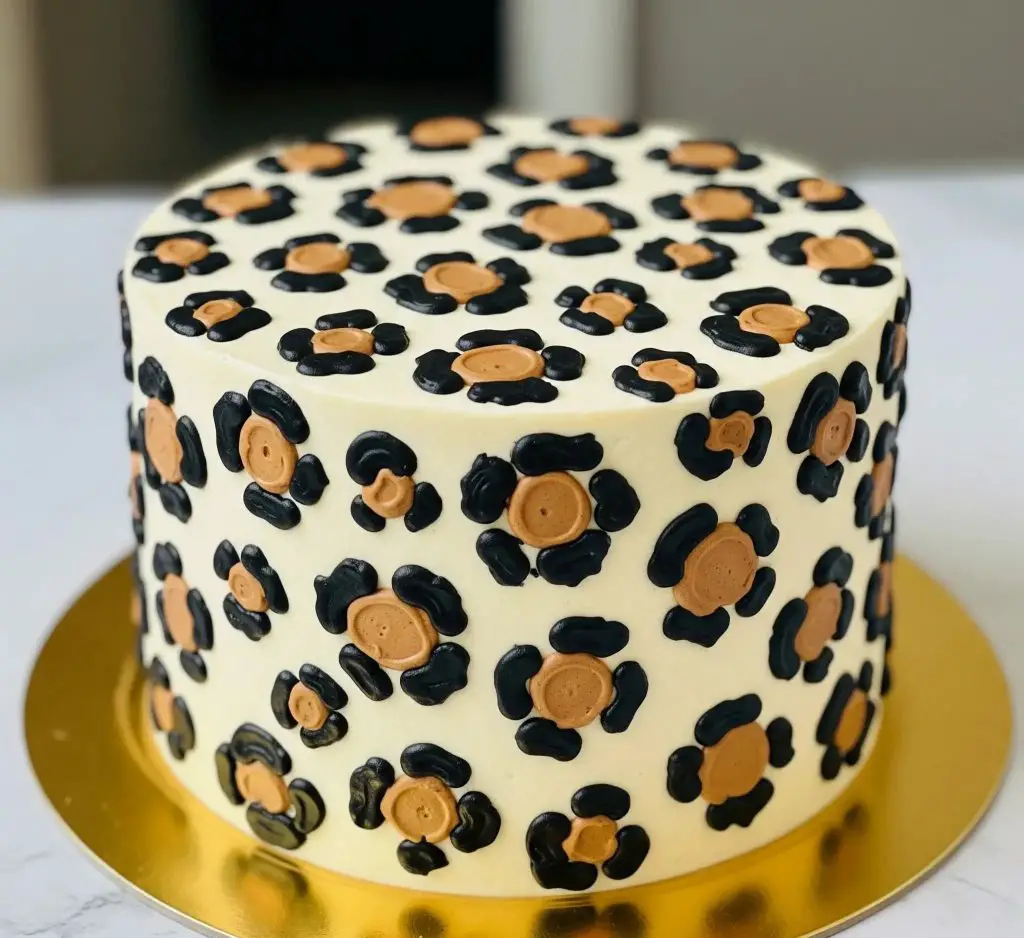
It wasn’t just another frosted cake; it looked alive, bold, and full of personality. People couldn’t stop staring at it before cutting into a slice, and honestly, that reaction made all the effort worth it.
What I love about this cake is that it looks like something you’d find in a high-end bakery, yet it’s surprisingly doable at home.
You don’t need special tools or years of decorating practice. Just a bit of patience, some food coloring, and a steady hand, and you’ll have a cake that looks wild in the best way possible.
Inside, it’s soft and fluffy with layers of vanilla cake and creamy buttercream that balance the striking look with a comforting taste.
If you enjoy baking projects that wow a crowd but still feel approachable, this cake hits that sweet spot perfectly.
Cheetah Print Cake Recipe
Ingredients
For the Cake (8-inch, 3-layer cake):
- 2 ½ cups all-purpose flour (sifted)
- 2 ½ tsp baking powder
- ½ tsp baking soda
- ½ tsp fine salt
- 1 cup unsalted butter (softened to room temperature)
- 2 cups granulated sugar
- 4 large eggs (room temperature)
- 2 tsp pure vanilla extract
- 1 ¼ cups whole milk (room temperature)
For the Buttercream Frosting:
- 2 cups unsalted butter (softened to room temperature)
- 7 cups powdered sugar (sifted)
- 5 tbsp heavy cream (or whole milk for smoother texture)
- 2 tsp vanilla extract
- Pinch of fine salt
For the Cheetah Print Decoration:
- ½ cup buttercream (dyed caramel/tan using gel food coloring: a mix of brown + small touch of yellow)
- ½ cup buttercream (dyed black using black gel food coloring)
- Remaining buttercream: left plain (off-white base)
Instructions
- Preheat oven to 350°F (175°C). Grease and line three 8-inch round cake pans with parchment paper.
- In a bowl, whisk together flour, baking powder, baking soda, and salt. Set aside.
- In a large mixing bowl, cream butter and sugar with an electric mixer until pale and fluffy (about 3 minutes).
- Add eggs one at a time, mixing well after each. Stir in vanilla.
- Alternate adding the flour mixture and milk, beginning and ending with the flour mixture. Mix on low speed until just combined.
- Divide batter evenly between prepared pans and smooth tops.
- Bake for 25–28 minutes or until a toothpick inserted in the center comes out clean.
- Cool cakes in pans for 10 minutes, then transfer to wire racks to cool completely.
- Beat butter in a large bowl on medium speed until creamy (2 minutes).
- Gradually add sifted powdered sugar, 1 cup at a time, mixing on low speed.
- Add vanilla, salt, and cream. Increase speed to medium-high and beat until light and fluffy (3–4 minutes).
- Divide buttercream into three bowls: keep most of it plain (for base coating), tint one portion tan/caramel, and another portion black. Use gel food coloring for best intensity.
- Level cake layers with a serrated knife if needed.
- Place one cake layer on a cake board or plate. Spread an even layer of buttercream on top. Repeat with remaining layers.
- Apply a thin crumb coat of plain buttercream all over the cake. Chill for 20 minutes.
- Add a smooth final coat of plain buttercream, using a bench scraper for sharp edges. Chill again for 15 minutes.
- Fit two piping bags with small round tips (Wilton #3 or #4). Fill one with tan buttercream and one with black buttercream.
- Pipe small tan dots/circles all over the cake surface.
- Using the black buttercream, outline each tan dot irregularly to mimic natural cheetah spots. Vary the size and spacing for a realistic look. Some spots should have broken outlines, while others can be fully circled.
- Continue until the entire cake is covered with the cheetah pattern.
- Smooth the edges of the cake board for a neat look.
- Chill the cake for at least 30 minutes before serving to set the design.
Can I Make a Cheetah Print Cake Without Special Cake-Decorating Tools?
Yes, you can. You don’t need professional tools to create this cake. Simple household items work well if used carefully.
- Use plastic sandwich bags: Fill them with colored buttercream and snip off a small corner to pipe the spots.
- Toothpicks or skewers: Use them to fix small mistakes or sharpen the outlines.
- Spoons and knives: Spread the base frosting smoothly before adding the spots.
- Cup for stability: Stand your makeshift piping bags in cups to avoid mess while filling.
Which Food Colors Are Used For Cheetah Print Cake Spots?
For realistic spots, gel food colors work better than liquid because they give strong shades without making the frosting runny.
- Black gel food coloring: For the outer outlines of the spots.
- Brown gel food coloring: For filling the inside of the spots.
- Small touch of yellow gel color: Mixed with brown to create a natural tan shade.
How Do You Keep The Buttercream Colors From Mixing Or Smudging?
Smudging happens when the frosting is too soft or when you rush. Here’s how to avoid it:
- Chill between steps: Let the cake rest in the fridge after crumb-coating and after the final base coat.
- Use stiff buttercream: Softer frosting melts quickly and causes the colors to blend.
- Pipe gently: Apply steady pressure instead of squeezing too hard.
- Don’t over-smooth: Once the spots are piped, avoid going over them with a spatula.
Can I Make a Cheetah Print Cake Ahead Of Time For a Party?
Yes, this cake can be made ahead, and it still looks and tastes great.
- Bake cake layers in advance: Wrap cooled layers tightly in plastic wrap and store at room temperature for a day or in the fridge for up to 3 days.
- Make buttercream early: Keep it in an airtight container in the fridge for up to 3 days, then re-whip before using.
- Decorate a day before: Finish frosting and piping the spots the night before your event. This gives the design time to set.
How Do I Get Clean Outlines For The Cheetah Spots On The Cake?
Clean outlines make the design pop. The trick is steady piping and patience.
- Use a small round tip: A #3 or #4 piping tip (or a small snipped bag corner) gives neat lines.
- Chill the base frosting first: A cold surface prevents colors from bleeding.
- Pipe in short bursts: Avoid long lines; work in small sections for better control.
- Wipe the tip often: Keep a paper towel handy to clean the piping tip for crisp edges.
How Do You Transport a Cheetah Print Cake Without Ruining The Design?
Moving a decorated cake can feel risky, but a few simple steps keep it safe.
- Chill before transport: A cold cake is firmer and less likely to shift.
- Use a sturdy cake board: It should be at least 2 inches larger than the cake.
- Cake box or carrier: Place the cake inside a snug box to protect the design.
- Flat car surface: Keep it on the car floor, not the seat, for stability.
- Drive carefully: Sudden stops or turns can damage the design.
How Do I Store a Cheetah Print Cake Overnight?
Storing the cake properly keeps the design fresh and the taste perfect.
- Refrigerator storage: Place the cake in a cake box and cover with plastic wrap to prevent it from drying out.
- Keep away from strong smells: Buttercream absorbs odors, so store away from onions, garlic, or strong foods.
- Bring to room temperature before serving: Take the cake out 45–60 minutes before cutting for the best texture.
You May Also Like To Check Out These Recipes:
- Red Velvet Cheesecake Cake
- Pumpkin Cheesecake
- Pumpkin Poke Cake
- Russian Tea Cakes
- Valentine’s Cake
- Cranberry Orange Cake
- New Year’s Cake
- Winter Cake
- Christmas Cake Pops
- Cranberry Christmas Cake
- Christmas Poke Cake
- Holiday Cake
- Christmas Tree Cake
- Red Velvet Bundt Cake
- Winter Wonderland Cake
- Snowflake Cake
- Thanksgiving Cake Pops
- Thanksgiving Cake
- Tiramisu Cake
- Red Vintage Cake
- Swedish Apple Cake
- Gingerbread Cake
- Scorpio Birthday Cake
- Pumpkin Cake Roll With Cream Cheese Filling